
|
 Contact UsDrop of Hope BioSand Filters
Grow and Go curriculumDrop of Hope School ProjectAfrican Countries SelectedCARICOM Countries SelectedFood for LifeChild EvangelismKids Discipleship TrainingYouth Trinity SeriesEnglish UCT Curriculum |
home>>grow and go >> drop of hope>> biosand filter installation Drop of Hope - BioSand Filter Installation Embedded Microsoft Office presentation, powered by Office.
BIOSAND FILTER INSTALLATION 1. Introduction : These are the steps to install a filter once it has been transported to the location: 1. Put the filter in a good location. 2. Put in the drainage gravel, separation gravel and sand. 3. Check the flow rate. 4. Flush the filter. 5. Fill out the monitoring form for Filter Installation Before you leave the home, you must teach the users how to use the filter. Try to install a few filters nearby each other on the same day. While you are waiting for the water to run through one filter, you can start installing the next filter. Before you install the filter, make sure the outlet tube is not blocked. When you fill the empty filter to the top with water, the flow rate should be about 1 litre per minute. When it stops flowing, the top of the water should be just below the diffuser. This should have been checked when the container was made. But it is good to check it again now - before you fill the filter with gravel and sand! Also make sure the inside of the filter is clean. Check that the filter is level. |
|
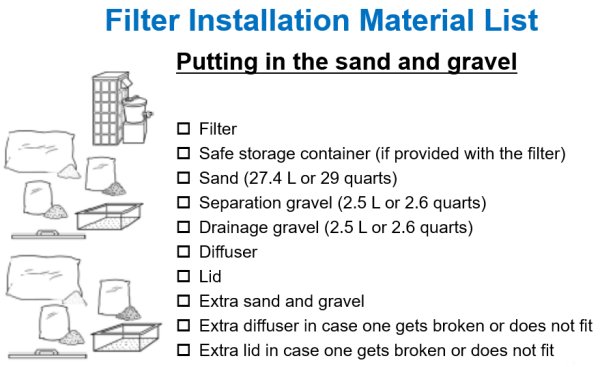
Filter Installation Material List Please refer to the separate checklist when gathering materials for a Filter Installation. These quantities are for ONE Filter, please plan accordingly depending on the number of Filters you will install on a particular day. Materials to take with you for a filter installation: You will need to take all of these materials with you when you go to install a filter.
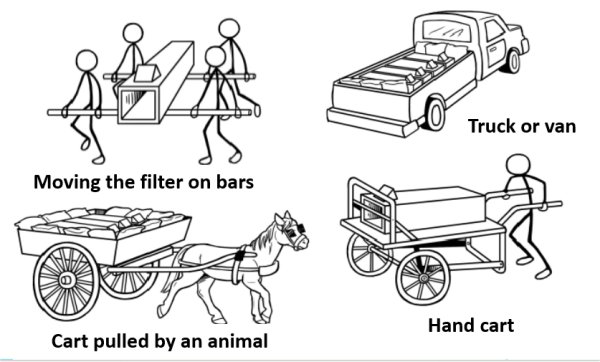
2. Transport the filter and supplies for installation
If you transport many filters in one vehicle, use sandbags, sacks or other materials to cushion the filters well.
Once the filter is filled with sand and gravel, it cannot be moved! If the user wants the filter moved later, a technician needs to come and take out all the sand and gravel. Then they can move the filter. Then the technician must reinstall the filter with sand and gravel as if it was a new filter. If the filter is moved without first taking out the sand and gravel, it may not work as well after it is moved. Sand or gravel may block the outlet tube. 4. Put in the sand and gravel 1. Put a stick into the filter and touch the bottom of the filter. Draw a line on the stick even with the top of the filter. Put a bucket under the filter outlet to catch any water that flows out during the installation. 2. Draw another line on the stick 5 cm (2") down from the first line. Draw a third line 5 cm(2") down from the second line. 3. Draw a line on the inside of the filter, about 24 to 26 cm down from the top. This is about where the sand should come to. Put about 10 litres of water in the filter. Having water in the filter when you put in the gravel and sand will prevent air pockets and dry spots in the sand. 4. Put drainage gravel into the filter until it is 5 cm (2") deep. This should be about 3 litres of gravel. Make the top of the gravel flat and level using the stick. Put the stick on top of the gravel. If the second line on the stick is level with the top of the filter, you have added enough gravel (5 cm). 5. Put separation gravel into the filter until it is 5 cm (2") deep. This should be about 3 ¼ litres of gravel. Make the top of the gravel flat and level using the stick. Put the stick on top of the gravel. If the third (bottom) line on the stick is level with the top of the filter, you have added enough gravel (5 cm). 6. Quickly add about 30 L of filtration sand, until the sand comes up to the line you drew on the inside of the filter. As you add the sand, the water level in the filter should always be higher than the sand. You may have a little dry sand at the very top - this is ok. 7. Put in the diffuser. Pour a bucket of water into the top of the filter. Let the filter run until the water stops flowing. This could take an hour or more. Use this time to educate the user or install another filter in a nearby location. HANDOUT:Download Handout #11- Transport and Install the BioSand Filter
A DROP OF HOPE
GROW AND GO CURRICULUM
SOWING SEEDS OF SUCCESS - MORINGA CURRICULUM
SUPER FRUIT CURRICULUM
NEW LIFE CURRICULUM
|


| Copyright © 2024 www.UnitedCaribbean.com. All rights reserved. Disclaimer Click to Contact us |