
|
 Contact UsDrop of Hope BioSand Filters
Grow and Go curriculumDrop of Hope School ProjectAfrican Countries SelectedCARICOM Countries SelectedFood for LifeChild EvangelismKids Discipleship TrainingYouth Trinity SeriesEnglish UCT Curriculum |
home>>grow and go >> drop of hope>> multi-barrier approach Drop of Hope - Multi-Barrier Approach Embedded Microsoft Office presentation, powered by Office.
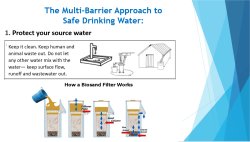
The Multi-Barrier Approach to Safe Drinking Water: The best way to reduce the risk of drinking unsafe water is to use the multi-barrier approach. 1• Protect your source water - Keep it clean. Keep human and animal waste out. Do not let any other water mix with the water- keep surface flow, runoff and wastewater out.
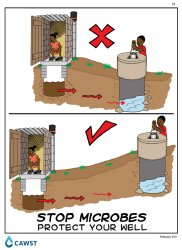
Stop Microbes - Protect Your Well Key Message: Build your latrine downhill and away from your well. Possible Questions: • Where is your latrine? • Where is your well? • What is the distance between them? • Do you think it is safe for your latrine to be next to your well? Content: This poster shows where to build your latrine to help keep our well water safe. Microbes from latrines move through the ground and can end up in the ground water. Latrines should be built far away from our wells. As a general rule, latrines should be kept 30 metres away from our wells. At this distance, microbes from latrines will die naturally before getting to the well. Latrines should always be built downhill of our wells since it is difficult for microbes to move uphill. This will help to protect our well water. Check for Understanding: • Why do we want to keep our latrine far away from our well? • As a general rule, how far should our latrines be built from a well? • Why should we build a latrine downhill of a well? Information sourced from CAWST.org
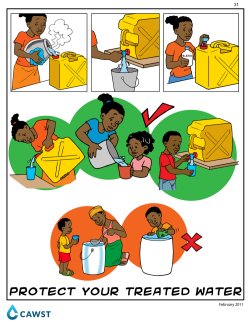
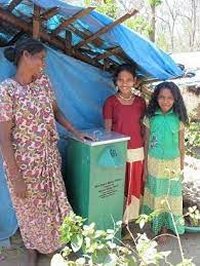
Protect Your Treated Water Key Message: Using a safe storage container and cleaning it regularly will protect your treated water. Possible Questions: • What kind of storage container do you use for drinking water? • How often do you clean the storage container? • How do you clean the storage container? Content: Cleaning your storage container will keep your treated water safe to drink. The tap may become dirty with use. The inside of the storage container should be cleaned: • When the container looks dirty • When you do maintenance • At least once a month To clean your storage container: • Wash your hands before cleaning the container • Scrub the inside of the container with soap and treated water • Empty the soapy water through the tap • Rinse the container with a little treated water • Add chlorine to water in the storage container - let it sit for 30 minutes - if chlorine is not available, let the container air dry • Empty the remaining water through the tap • Clean the tap with a clean cloth and chlorine solution (such as bleach) The storage container is clean and safe to use. When removing water from the storage container, always pour the water from the container to a cup or glass. Teach children to pour out the water when they need to drink. Do not dip cups or dippers into the storage container. This will contaminate your drinking water and storage container. If the storage container is too big to pour and does not have a tap: • Use a dedicated dipper with a long handle • Clean the dipper everyday with soap and water Check for Understanding: • How often should you clean the storage container? • How should you clean the storage container? • Why do you need to clean your storage container? • How should you remove water from the storage container? • How can the storage container become recontaminated? Information sourced from CAWST.org 2. Sediment your water - Let the dirt and large particles in the water fall to the bottom. You can either leave it to settle on its own or use alum, Moringa seeds or prickly pear cactus to help the dirt settle. We will learn more about Moringa seeds later in these lessons. |
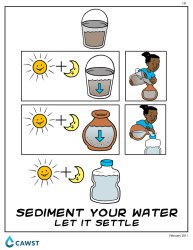
Sediment Your Water - Let it Settle Key Message: Natural settling can be used to help remove sediment from your water. Possible Questions: • Have you ever allowed your water to sit for awhile to sediment the water? • Explain how you usually settle the water. Content: The first step in treating your water is to perform sedimentation. When our water is dirty we can settle it. Microbes like to stick to sediment, so by allowing the sediment to settle out we are removing microbes. We can sediment our water by allowing the particles to settle. This method is called 3-pot settling because you will need three buckets or pails for the process. To settle the water: • Get a bucket of dirty water • Allow the bucket to sit without moving it for about 24 hours • Pour the clear water from the bucket to a clean bucket • Allow the second bucket to sit without moving it for about 24 hours • Pour the clear water from the bucket to a clean storage container Cover your pots while they are settling so that more dirt and mosquitoes do not enter the water. By using 3-pot settling, we are helping to get better water. We still need to filter and disinfect our water after settling it. Check for Understanding: • Why would you want to settle your water? • How would you use 3-pot settling? • Is the water safe to drink after settling? Information sourced from CAWST.org
Sediment Your Water - Use Seeds Key Message: Moringa seeds can be used to help remove sediment from your water. Possible Questions: • Have you ever used seeds to sediment your water? • If yes, how do you usually use seeds? Content: The first step in treating your water is to perform sedimentation. When our water is dirty we need to sediment it. Microbes like to stick to sediment, so by removing the sediment we are removing microbes. We can sediment our water using seeds. Different seeds are used in different countries and regions. Some seeds that can be used for sedimentation are: Moringa (Africa, Caribbean and parts of Asia). There are different ways people use seeds to sediment their water. Explain how to use the seeds available in your area. One way is to do the following steps: • Let the seeds dry out in the sun • Grind up some seeds • Add a handful of ground seeds to a bucket of dirty water • Stir the water with a spoon or stick for a few minutes • Let it settle for a couple of hours • Pour the clear water into a clean storage container The seeds will be left at the bottom of the bucket. They should be thrown out with the rest of the household garbage. By using sedimentation, we are helping to get better water. We still need to filter and disinfect our water after using seeds. Check for Understanding: • Why would you want to use seeds? • How would you use seeds to sediment your water? • Is the water safe to drink after sedimentation?
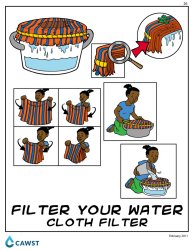
Filter Your Water - Cloth Filter Key Message: Use a cloth filter to provide better quality water. Possible Questions: • Have you ever seen or used a cloth filter? • How do you think the cloth filter works? Content: The cloth filter can remove some sediment and dirt from the source water. Some microbes will pass through the cloth. You can use any cotton cloth that is fine and tightly woven to filter your water. How to make the cloth filter: • Take a long piece of cotton cloth • Fold the cloth into a few layers • Secure the cloth over a clean pot using string or rope • Slowly and gently pour water through the cloth filter • Wait for some water to filter before pouring more water • Stop when the level of water in the pot is not quite touching the cloth This method is good for removing some dirt and microbes. To ensure good quality water, disinfect your water after using the cloth filter to kill the remaining microbes. Advantages: • Removes some microbes and sediment • Cotton cloth is available within the home • Low-cost Disadvantages: • Least effective filtering methods at removing microbes Check for Understanding: • How does the cloth filter work? • What are some of the good things about the cloth filter? • How do you create a cloth filter? • How do you use a cloth filter? Information sourced from CAWST.org 4. Disinfect your water - After removing the dirt and large particles, disinfecting the water will get rid of any of the pathogens that are left - even the very small ones that were too small to be filtered out of the water. You can use chlorine, boiling, or solar disinfection (SODIS).
Disinfect Your Water - SODIS Key Message: Solar disinfection (SODIS) is a good way to disinfect your water.
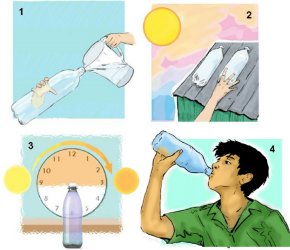
Content: SODIS stands for solar disinfection. During SODIS, the rays from the sun kill microbes in the water making it safe to drink. Your source water needs to be clear to use SODIS. If the source water is dirty, use sedimentation and filtration methods before using SODIS. To perform SODIS, use plastic bottles that are clear . The bottles cannot be coloured, dirty, or tinted because the sun's rays will not pass through the bottle. The bottles should hold 1-2 liters of water. To perform SODIS: • Clean a plastic bottle with soap and water before using it • Fill the bottle full of water, leaving no air bubbles • Close the lid tightly • Place the bottles in direct sunlight, on a corrugated iron sheet or put them on the roof • On a sunny day, expose the bottles from morning to night or for at least 6 hours • On a cloudy day, expose the bottles from morning to night for 2 days • On a rainy day, SODIS does not work - use another disinfection method • Remove the bottles from the sunlight The water in the plastic bottles may be warm or hot. You may want to wait until the water cools down before drinking it. The water in the plastic bottles is safe to drink.
Disadvantages: • Water will be warm after disinfection • Only effective for small quantities of water • Process takes at least one day Check for Understanding: • What does SODIS stand for? • How does SODIS work? • What are some of the good things about SODIS? • How would you use SODIS? • What if your source water is dirty? What would you do? • If it's a sunny day, how long should you expose the bottles? • If it's a cloudy day, how long should you expose the bottles? • If it's a rainy day, what would you do? Information sourced from CAWST.org 5. Store your water safely - Keep your treated water in a container that will keep it from getting dirty again. Key Message: Treated water should be stored properly to keep it safe. Information sourced from CAWST.org
A DROP OF HOPE
GROW AND GO CURRICULUM
SOWING SEEDS OF SUCCESS - MORINGA CURRICULUM
SUPER FRUIT CURRICULUM
NEW LIFE CURRICULUM
|


| Copyright © 2024 www.UnitedCaribbean.com. All rights reserved. Disclaimer Click to Contact us |